What is a DNS Server?
Every server has a unique IP address that tells your computer and all the routers along the way which way to redirect information in order to get to and from the server. When you type in “google.com” in your web browser, how does your computer know which IP address it should ask in order to retrieve information from the Google server? This is where a DNS server comes in.
A DNS server acts as a phone book for the internet. Because IP addresses are hard to remember (just like your friend’s phone number) it is much easier to remember a website by its domain name (like google.com). The DNS server has a table that translates the domain name into the server’s current IP address. Because there are a limited number of IP addresses, and not nearly enough to address every server, the public IP address of a server can change all the time. The job of the DNS server is to keep its table or cache up to date, so whenever the IP address of a server changes, the DNS server can still deliver the up-to-date IP address of the server.
Recursive DNS resolution
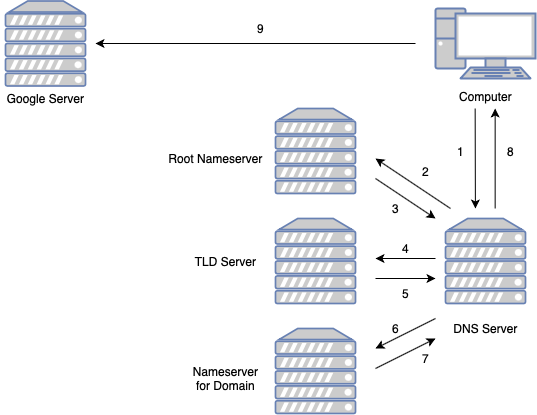
If the locally stored IP address for a particular domain name is no longer correct, then the DNS server needs to resolve the new IP address by recursively sending queries to three different servers. First, the DNS server queries the root nameserver. The root nameserver looks at the last part of the domain name (.com or .net) also known as the top-level domain (TLD) in order to determine the IP address of the server that is responsible for the given TLD. The DNS server then queries the TLD server for the IP address of the domain nameserver that is responsible for the domain. At last, the domain nameserver is queried to retrieve the new IP address of the server which belongs to the entered domain. Because the DNS server needs to query a sequence of nameservers in order to arrive at the IP address belonging to the domain name, this is also called recursive DNS.

Because the DNS server needs to query a whole line of different servers, this process can be quite lengthy, resulting in a delay when loading up a website. This is the reason that DNS servers keep a huge cache of IP addresses and domains stored locally as mentioned before. Even your computer keeps a cache of the most recently visited websites in order to speed up the loading of websites.
Why host your own DNS Server?
Why use PiHole?
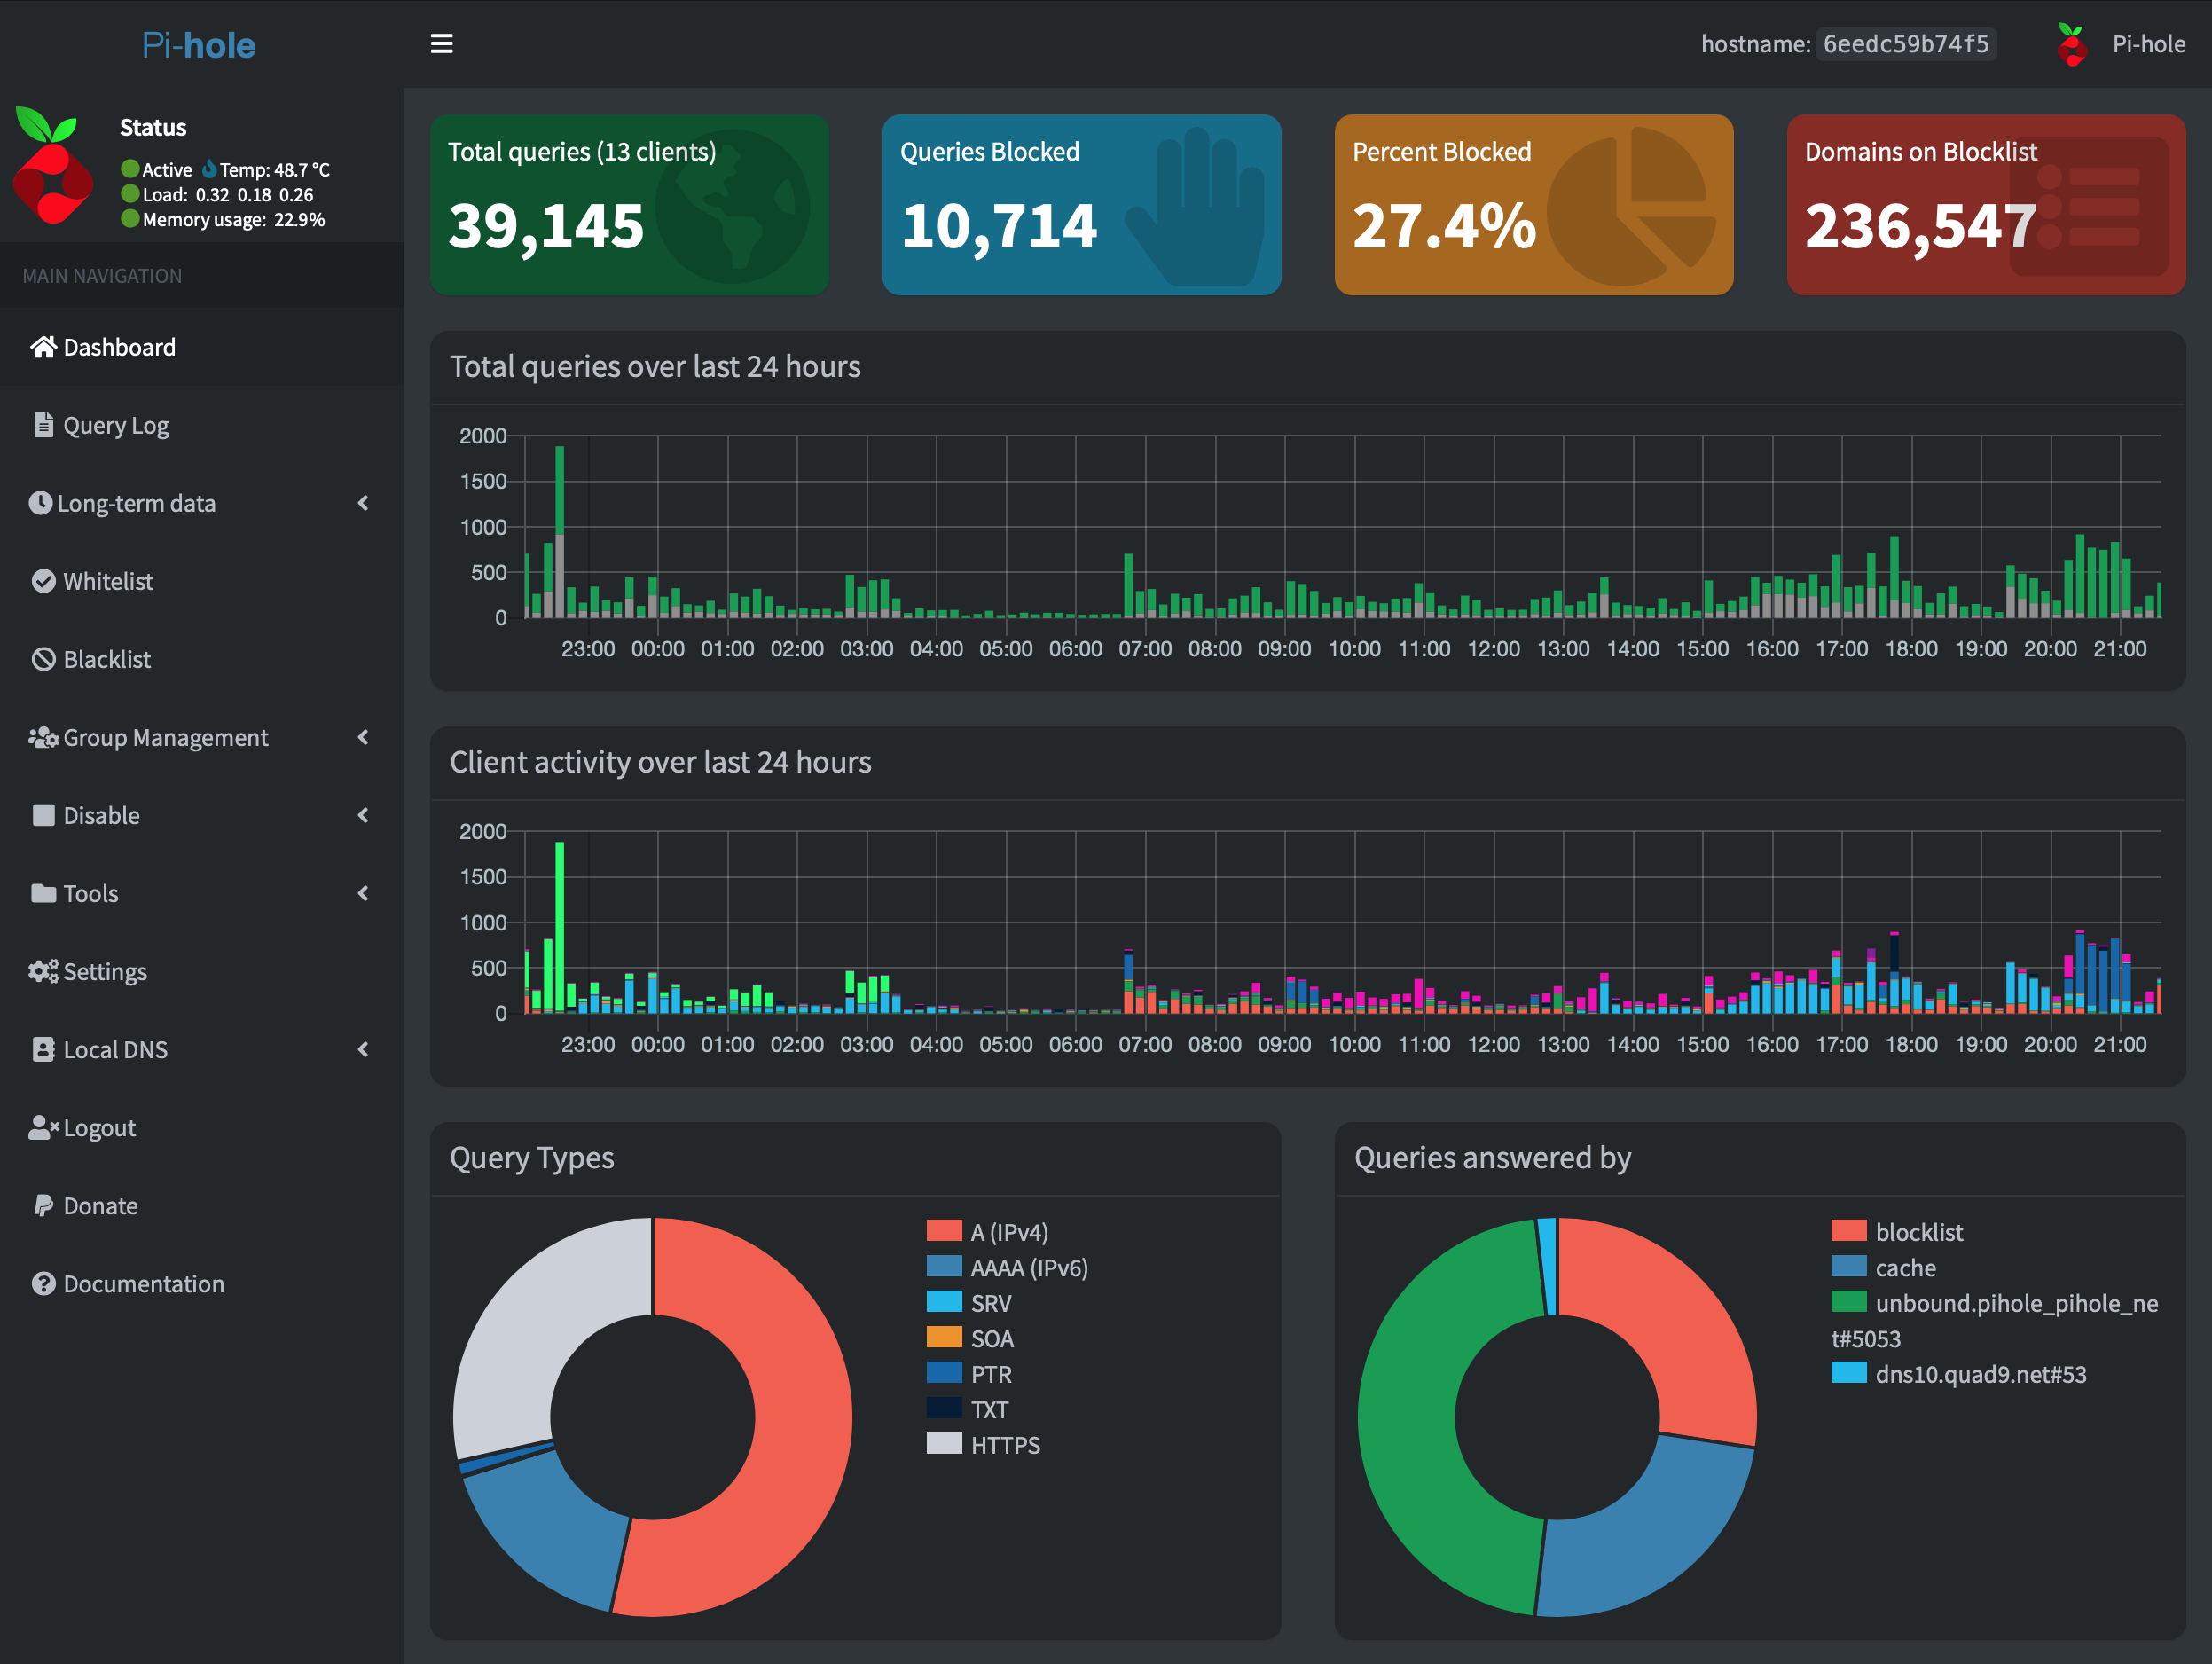
Hosting your own caching DNS server like PiHole can have a few benefits. When you load a website with advertisement or analytics built-in, a DNS query also needs to be made in order to find the server responsible for the advertisements. If you have control of the domain names that get resolved and which don’t, you can set up a blacklist or filter of domains that should not be resolved by your DNS server. The rest can be queried using an upstream DNS server of your choice (like one from Google or Cloudflare).
This way you can essentially create a network-wide blacklist of all domains which will never get queried, allowing you to block ads on all devices connected to the network. Additionally, DNS resolutions forwarded to the DNS server of choice, get cached locally, so frequent access to a particular domain can be resolved by multiple devices in the network much quicker. After all, retrieving data from a local server is much faster than one located halfway across the world. Of course, since IP addresses change quite frequently, this local cache is not always up-to-date, resulting in your local DNS server forwarding the request to the upstream DNS server every now and then.
Why use Unbound?
It is possible to take your local DNS server a step further, and instead of using an upstream DNS server to resolve requests using their cache, you can resolve them completely locally. Using a tool like Unbound, you can essentially set up your own recursive DNS server as described in the intro. The upsides here of course being that your DNS queries don’t run through a companies server, where there is a possibility of logging and data collection. While privacy is an upside, speed may be a downside. Instead of referring to a server that has already done the recursive querying of the IP address belonging to a particular domain name, that querying needs to be done by your server, every time it encounters a domain name, not in the local cache.
Alright, so you have decided privacy is more important than speed. Now let’s move on to how to actually set up your very own recursive DNS server using a combination of PiHole and Unbound.
Installation of PiHole and Unbound using Docker-Compose
Docker Compose Config
First, make sure you have docker and docker-compose installed and up-to-date.
Create a new directory: mkdir pihole with a
new docker-compose config file:
vim docker-compose.yml
Now we will go through the config file in order to understand what is going on behind the scenes.
services:
  pihole:
    container_name: pihole
    image: pihole/pihole:latest
    restart: unless-stopped
    cap_add:
      - NET_ADMIN
We will use the most up-to-date version of docker-compose and also the latest version of the PiHole docker image. The official PiHole docker documentation can be found here. In case something goes wrong with the container we want it to automatically restart unless we specifically stop it. We also want the container to have administrative capabilities to modify network interfaces. This is important if you want to use PiHole as your DHCP server as well.
    ports:
      - "53:53/tcp"
      - "53:53/udp"
      - "67:67/udp"
      - "80:80/tcp"
      - "443:443/tcp"
Next, we need to expose the necessary ports. Port 53 is the official port for all DNS requests, and port 67 is the official DHCP port. Do not change these! Port 80 and 443 are to access the PiHole web UI. If you already have a service exposed on port 80, you can change the number to the left of the “:” to another port number.
If you use Wireguard and want to use the PiHole as a DNS for your VPN, then you need to explicitly specify the local IP address AND the Wireguard address of the server running PiHole in the ports section for port 53. It should look something like this:
    ports:
      - "192.168.188.xxx:53:53/tcp" # Local IP
      - "192.168.188.xxx:53:53/udp"
      - "10.13.13.xxx:53:53/tcp" # VPN IP
      - "10.13.13.xxx:53:53/udp"
      - "67:67/udp"
      - "80:80/tcp"
      - "443:443/tcp"
In order for PiHole to store some persistent
configuration files, specify a location on your local
machine to the left of the “:” under volumes (here it’s just
in the pihole directory we made). Under
links: add unbound, such that the containers
can communicate without unbound having to open a port.
    volumes:
      - './etc-pihole/:/etc/pihole/'
      - './etc-dnsmasq.d/:/etc/dnsmasq.d/'
    links:
      - unbound
Now for some environment variables to pass into PiHole.
    environment:
      TZ: 'Europe/Berlin'
      WEBPASSWORD: 'secure_password'
      DNS2: 10.0.0.2#5053 #Unbound as MAIN DNS
      DNS1: "149.112.112.10" #Another DNS as BACKUP DNS
      PROXY_LOCATION: pihole
Set the timezone and password for the web interface. Here we can set up the upstream DNS servers PiHole uses to resolve requests. For DNS2 put 10.0.0.2#5053; 10.0.0.2 and 5053 being the IP address and port of the Unbound container as we will see in a little bit. For DNS1 put a backup upstream DNS server of your choice, in case Unbound is for some reason not able to resolve a particular request… or if it’s just taking too long for PiHole. I chose a Quad9 DNS server, which is known for its respect for privacy and security. It may seem unintuitive why the numbering is switched, but this is due to what seems like a bug and I will clarify later.
Lastly, we want to connect the PiHole container to a network so it can communicate internally with the Unbound container:
    networks:
      pihole_net:
        ipv4_address: 10.0.0.3
In this case, the network is called
pihole_net and this container has an IP address
of 10.0.0.3. This can be whatever since we don’t actually
use it anywhere.
We can now move on to the Unbound container, which will handle the recursive resolution of IP addresses.
  unbound:
    container_name: unbound
    image: klutchell/unbound:latest
    restart: unless-stopped
    networks:
      pihole_net:
        ipv4_address: 10.0.0.2
This one is pretty easy because there isn’t much
configuring necessary for it to work. Note the IP address
you choose here and make sure it matches with the
DNS2 field in the PiHole container.
Lastly, we want some lines to set up the bridge network for the two containers.
networks:
  pihole_net:
    driver: bridge
    ipam:
      config:
        - subnet: 10.0.0.0/29
Here we are saying that we want the network to act as a bridge, so just allowing communication between the containers. Make sure the subnet matches the two IP addresses used in the containers.
Your final docker-compose.yml should look
like this:
version: "3.7"
services:
  pihole:
    container_name: pihole
    image: pihole/pihole:latest
    restart: unless-stopped
    cap_add:
      - NET_ADMIN
    ports:
      - "192.168.188.xxx:53:53/tcp" # Local IP
      - "192.168.188.xxx:53:53/udp"
      - "10.13.13.xxx:53:53/tcp" # VPN IP
      - "10.13.13.xxx:53:53/udp"
      - "67:67/udp"
      - "80:80/tcp"
      - "443:443/tcp"
    volumes:
      - './etc-pihole/:/etc/pihole/'
      - './etc-dnsmasq.d/:/etc/dnsmasq.d/'
    environment:
      TZ: 'Europe/Berlin'
      WEBPASSWORD: 'secure_password'
      DNS2: 10.0.0.2#5053 #Unbound as MAIN DNS
      DNS1: "149.112.112.10" #Another DNS as BACKUP DNS
      PROXY_LOCATION: pihole
    networks:
      pihole_net:
        ipv4_address: 10.0.0.3

  unbound:
    container_name: unbound
    image: klutchell/unbound:latest
    restart: unless-stopped
    networks:
      pihole_net:
        ipv4_address: 10.0.0.2

networks:
  pihole_net:
    driver: bridge
    ipam:
      config:
        - subnet: 10.0.0.0/29
That’s it! You can now run
docker-compose up -d to start up the two
containers. You can log into your PiHole UI under:
<PiHole-Server-IP>:80/admin with the
password, you entered in the PiHole container environment
variable. If you go under Settings > DNS you should see a
checkmark under Upstream DNS Servers in Custom 1 (with the
IP address of the Unbound container and port #5053) and in
your backup upstream DNS server of choice. I’ve also had
better luck with using just the eth0 interface to listen for
requests, rather than all interfaces.

We now need to do a few additional configurations so Unbound will be used as the primary upstream DNS server.
Additional Configuration
Strict ordering of upstream DNS servers
With the current setup, PiHole will forward all DNS
requests to both Unbound and the backup DNS server, and just
take the one that responds faster. In order to primarily use
Unbound for DNS resolutions, we need to add a config file to
the etc-dnsmasq.d directory with
nano /etc-dnsmasq.d/99-custom.conf. Add
strict-order to the file and save. This tells
PiHole to query the upstream DNS servers in order and not at
random. This is where the current bug lies. According to our
docker-compose.yml, our Unbound DNS resolver
should be used as a backup since it is under
DNS2 but for some reason, the
strict-order argument uses the second DNS
server first, then the first one.
Change local DNS server settings
The last step is to specify your PiHole server as the DNS server for the network. To do this log into the UI of your router and look for the DNS settings. For the FritzBox it’s under Internet > Account Information > DNS Server. Add the IP address of the server running PiHole in both fields. For the FritzBox I also had to add the same IP address to Home Network > Network > Network Settings > IPv4 Settings under Local DNS server. If you choose to use PiHole as a DHCP server you can disable that here too.
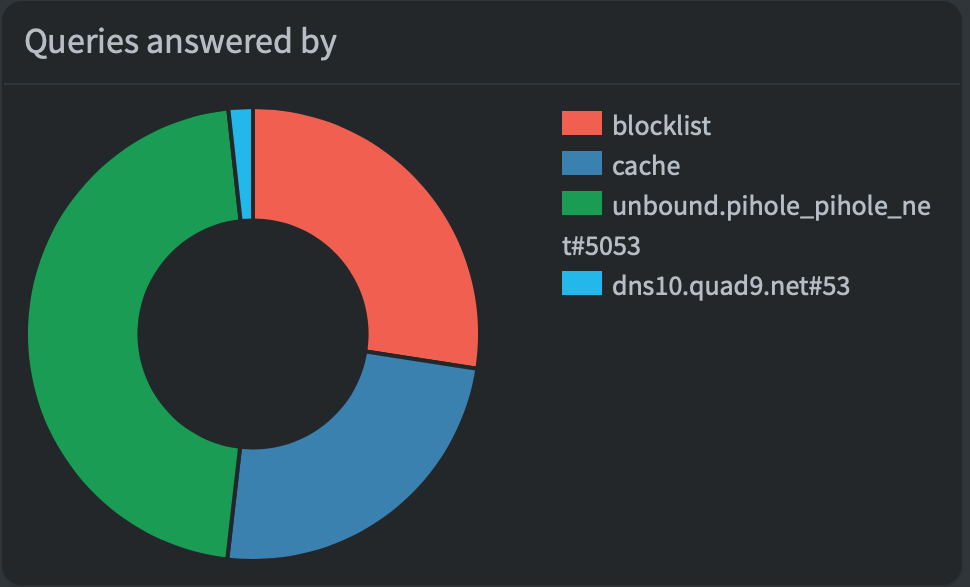
After using the web for a little bit, and you look at the
“Queries answered by:” pie-graph, you should see unbound
taking pretty much all of the requests that aren’t blocked
or cached. Sometimes Unbound is a little bit slow and PiHole
will choose to ask your backup server. In my experience,
this only happens for about 1% of requests. If this is not
the case, try switching the DNS2 and
DNS1 addresses in your
docker-compose.yml config.

Increase caching performance
To increase performance even more, Unbound can be used to
do the cahcing rather than Pihole. First, disable Pihole
caching by setting CUSTOM_CACHE_SIZE: 0 in the
docker-compose.yml file for pihole. Then, pass
a directory with the unbound configuration file into the
unbound container:
    volumes:
      - ./unbound-config:/etc/unbound/custom.conf.d
Create and edit unbound-cache.conf in
unbound-config to include the following:
server:
    prefetch: yes
    prefetch-key: yes

    cache-min-ttl: 300
    serve-expired: yes

    msg-cache-size: 128m
    rrset-cache-size: 256m

    num-threads: 4
What’s happening here? Prefetch refreshes soon-to-expire cache entries to keep them up to date. Expired entries can be served without waiting for the resolution to finish. The cache size is increased as well to hold more cached entries. Lastly, the number of threads used to resolve entries is increased. Make sure this is less than or equal to the number of available cores on the device!
Other things to try
That’s pretty much it! You should now have your own recursive DNS that filters out advertisements and other data-collecting thieves from websites. You can also set local DNS entries under Local DNS. No more entering the IP Address of your servers! Under Group Management > Adlists you can also add additional Adlists to get blocked by PiHole. I recommend adding the green lists from https://firebog.net. If something you need doesn’t work, you can find out what the domain is called by either going through the Query Log or by looking at the pihole.log under Tools. You can just add the domain to the Whitelist to tell PiHole to resolve the IP address for that domain.
Bonus Tip: If you use Wireguard and the DNS server is a client of your Wireguard network, you can use its VPN IP as a DNS server for each of your Wireguard clients and you will be ad-free even outside of your LAN!